
first gather up your supplies. in the first picture you will see just about all the tools i use. but it helps to have a belt sander as well. if you dont have one i suggest you use only 90 and 45 degree angles. the second picture shows the diamond volume i built a while ago. the goal is for this new volume was to allow multiple volumes to be added/mounted on to it.... im so creative...


so i cut out my two main face panels. this will be the first step of almost every build. next i bevelled some 2x4's to about a 45 degree angle. now josh just builds his with as many screws as he has lying on the floor of his garage but i like to be slightly more anal with my builds. i use a combination of screws and wood glue. gorrilla glue seems to work really well. just avoid getting it all over your clothes. i use a good bead then the screws pull it together. pre-drill all your holes and pre-start the screws so it goes quick once the glue is on.


as you can see by many of my pictures i like to trim of extra wood after its semi in place. not the most crafty way to do it.. but it works for me. im not a super carpenter, thats why i was considering going into the messiah business....kidding... but seriously this is just the way it has worked for me. given that i like to subtract slowly so i get a nice finished product.


the glue tends run out by the way... so have a paper towel ready. the next shot illustrates my point. at this point i have added the additional framing for the side panels. and if you look at the smaller face panel there is extensive framing with 2x4's. this is because i intend to make this panel removable... youll see. then i run the side across a belt sander... forever. until it has the right angle and flat surface for mounting the sides onto. overall this will make the volumes stronger because i can make the fit tighter and add glue. when im done with the volume i will also go back and add extra glue in all the corners... cant have my heavy ass busting a seam!


to make pattern for cutting out the sides i like to lay the volume down on the plywood. i cut from and trace the exact shape i need. it seems to help me not screw up the measurements and ... well kids tracing is faster. in the past for harder shapes i have even covered the place with paper to make an exact pattern of the panel i need. its called tracing kids, ...sure you didnt draw blunt man and chronic but what you did was add depth and shading... wait what? regardless the panels are added on the same as before with lots of gluing and screws. now i know it looks funny with the bracing sticking out... but well cut those off soon.


so there it is, the basic box is done all the panels are more or less as they need to be.


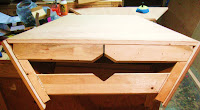
so i guess once you have it all together the only thing left to do is... take it apart. i already said i intend to have a removable lid. this is so the volume can be mounted from the front of the wall by a single person. i will go into that more... but for now lets make the lid. i pulled all the screws and removed the lid panel i realized my arm was to big to fit between the 2x4's... so i cut a little diamond shaped slot to give me access.


with the lid off i started working on the mounting braces. they are beveled at the ends to fit flush with the side panels. i wanted the "top" board to sit high so i made an additional bevel lengthwise to allow it to snug up tighter.


of course once i did this i realize the place where i wanted my t-nuts to go would get covered... so i placed them before mounting the brace. it will be a little problematic when setting on this row of t-nuts... and it will make it really difficult to replace the t-nuts... but what can ya do. i needed to place them there to make the lid strong and removable. the second brace went in without a hitch. i just needed to leave enough room to sneak the mounting bolts in. the holes in the braces are made to be exactly 1ft x 1ft square. i make my standard wall spacing 6x6 inches so it will fit nicely. but if i decide to place it in an off angle i can drill new t-nuts in the wall. it mounted nicely on joshes wall as you saw in the previous post. the only thing left is the finishing "pretty" work to do.


The way i figure it, only about four bolts need to be used for the lid, and those can be mounted with holds... so its a win-win. "she may not look like much kid, buts she's got it where it counts"
check out the next post where i pretty the shield up and get it ready for use!
No comments:
Post a Comment