~~~~~~~~~~~~~~~~~~~~~~~~~~~~~~~~~~~~~~~~~~~~~~~~~~~~~~~~~~~~~~~

the whole point of this blog is to help others with all the questions they have about setting up a similar home climbing gym, and ramble about a variety of climbing related subjects.
There is a variety of subjects... most involving rock climbing, written about on this blog. MAKING VOLUMES OR CLIMBING HOLDS, is probably one of the more popular subjects. just check the labels links or search bar to find your fancy.
of course if you want to go back and start from the beggining, please do! to that end, if there are any question let me know ... i encourage you to add comments for others to read or if you want to get me directly you can email me at treadwallproject@hotmail.com
IF THIS IS YOUR FIRST TIME, READ THE MUST READ LIST.... oh!, ...and you have to fight!
Showing posts with label Treadwall Upgrade Options. Show all posts

Monday, January 24, 2011

the perfect route


i like giving you images first and letting you thinking about where this is all going! any ideas?

(treadwall) - (assembly) + (colorful yet cryptic drawing) = ....blog post!

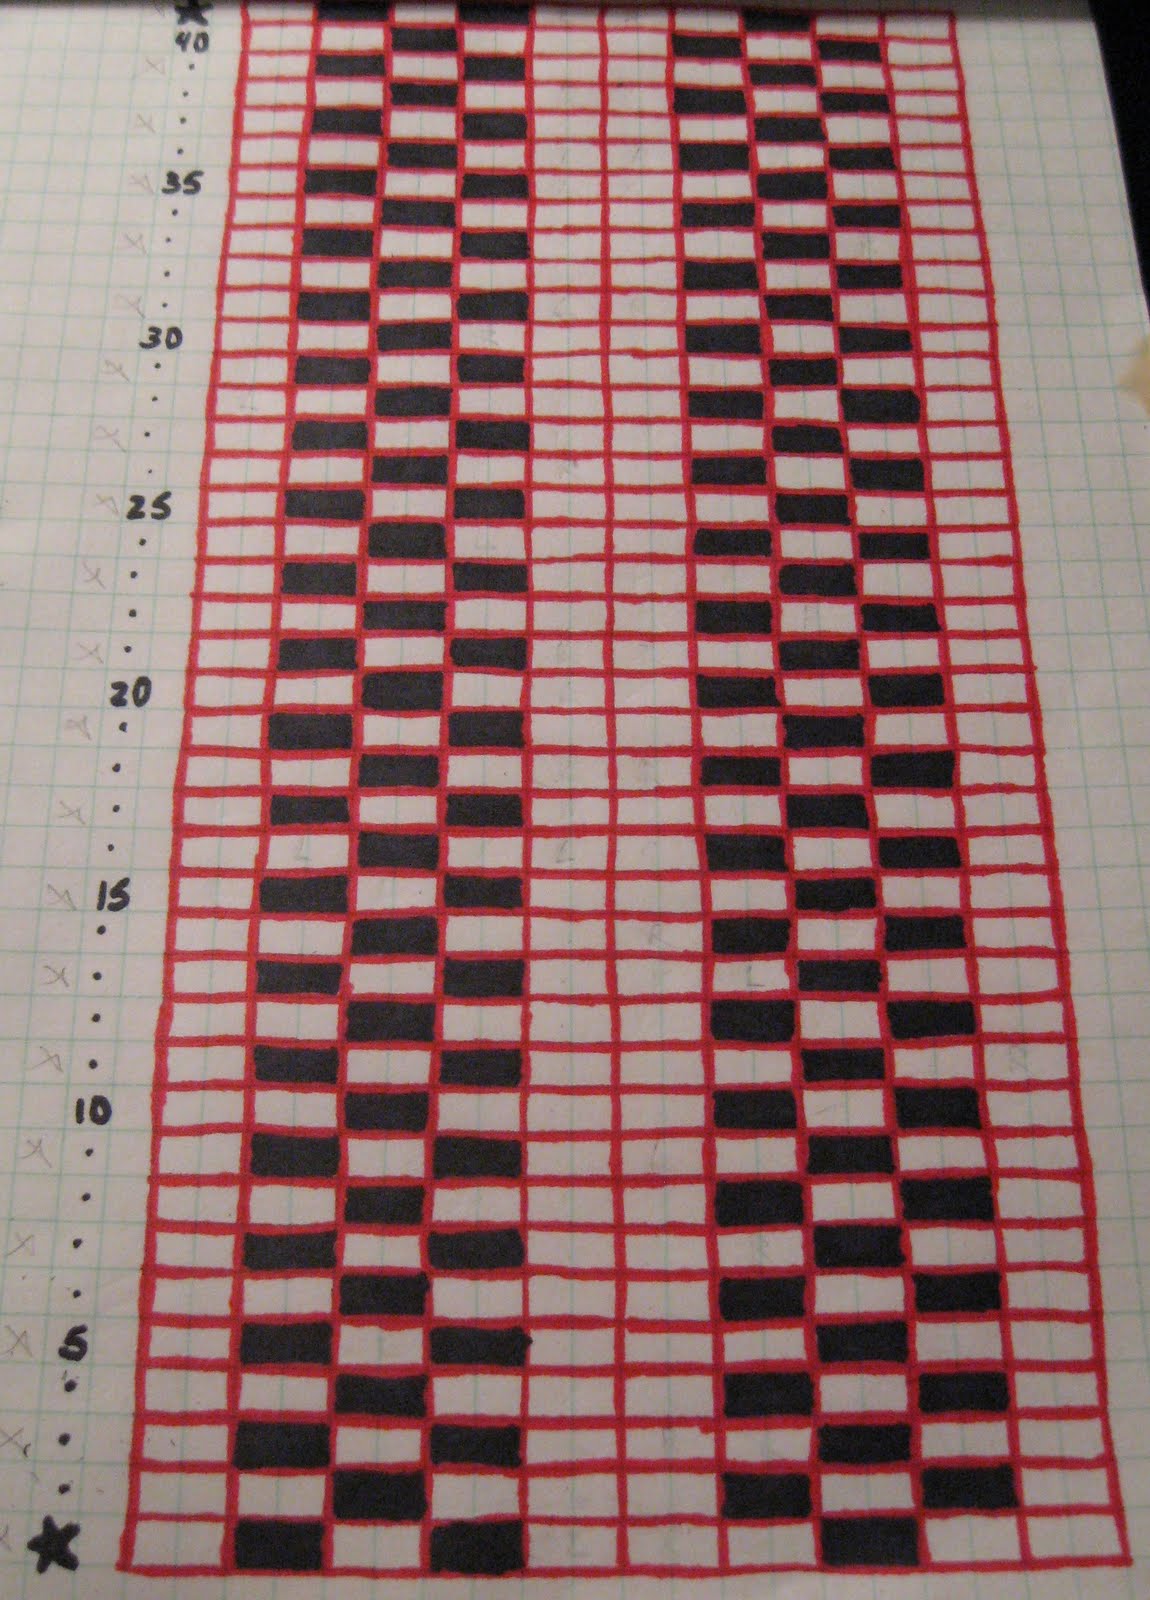
alright for awhile now i have been trying to make the perfect route for warming up and doing never ending mileage on the treadwall. i had some criteria for the route. i wont bore you with all those details so we can skip to the point. i wanted the route to have equal movement bilaterally for the body. often routesetters will unconsciously set routes to favor their strong side, be it left or right. the treadwall is a perfect medium for avoiding this failure.... or so i thought. that drawing above was the first map i made for the treadwall. it's crude, but it shows all the possible bolt positions in one rotation of the wall. i made it so i could plan out my perfect route as opposed to trying to due it freely on the route as i have done when i first got my treadwall set up.


here comes the bad part... im sorry brewer's ledge, but your wall has a flaw. it is impossible to set a route to have exactly mirrored movement for the hands and feet. not in their method of assembly anyway. after spending WAY TOO MUCH time on this problem i finally came up with one solution. i would take off half of the panels and reorder them so that the first 10ft of climbing was set opposite to second 10ft.

on the right here you see my second map.... i made this one on the computer... got tired of drawing, and now i can print out a new one if i need it. but by comparing the two maps you can see where i change the bolt pattern to allow for the setting of a perfect route. focus on panel lines 1&40 as well as 20&21. by making this adjustment i was able to set a route that recycles and is perfect to the micron... okay not that perfect but its as perfect as 1+1=2.

oh, little caveat i dont belief all treadwalls have this problem... i looked back through some of my archive photos and i think this bolt pattern is specific to the newer treadwalls. im not positive but i believe some older walls had a more standard grid bolt pattern (as opposed to the offset pattern found on my wall). if im wrong oh well...fixed my issues anyway. GARNET!? i know you read this bad boy... throw in a comment what do you think?! dont be shy... unless you might get fired? in which case, dude take care of your fam-damly!

these last two shots i put in a bunch of my own foot chips (yup! designed, molded, and poured in my house) on the re-ordered panels to help emphasize how the bolt placements are offset. the blue tape line show the gap between panels 1&40 by the way. lastly ill say, i like the offset pattern, it helps with being able to see where to put your feet. it doesnt stack the holds on top of each other too much. but the standard factory assembly instruction tweaked a bit works better for me. i said my piece, check out the last pics, comment if you have a pair!


Thursday, September 9, 2010

fully retractable

yeah i just like to have ideas...then try them out... then ramble online about them weather is all crappy. enjoy it, now that my wall is set up and i get back into rock climbing... as opposed to blogging about it, youre probably not gonna get thirty post a month. (blogging is kinda of a sad made up word that i am unfortunate to have in my vocabulary... just to be honest with myself)

getting to the point. so you all know im a fan of the adjustable leg stands for the treadwall KORE. but i found i need a little something more. the legs dont have graduation marks on them. so... what to do?... what to do?... i know... engrave it! crap i dont have an engraver, in fact i dont know how to engrave something... no experience with even watch a youtube video of engraving. but if you can ...by all means, go for it. instead you can use my sharpie method!

all you need is a sharpie, preferably one with the wide tip end and a T-square.


extend the leg to their tallest setting, then place the square as shown in the picture. from here make some marks as you see fit. i went with one inch spaces...seemed like a good idea at the time.

next take the wide tip and make a thick line using the larger jacket (dark gray) to trace your line. you can slowly drop the crank to make each lower line.


it will look something like this when your done. oh... and when you done you can also mark it with some refrence numbers. might help a bit. in the end, you are all set to advance your angle of difficulty as you get stronger, all the while being relatively certain that youve kept the wall level.

Thursday, September 2, 2010

on display

so i have mentioned that i think the distance counter is worth while to get. and i ordered one with my wall. unfortunately they guys forgot to include some of the wiring for it. see an extra power line needs to split off from the auto-stop to light the display and i thought for a while that i was missing something. but i eventually call Conant. we rapped for a bit and in the end he told me he would throw the wire in the mail. i only mention this because it illustrates these guys and how they treat their customers. several times i have gotten calls and emails just to check and make sure things were up and running as it should. they have the "small company that cares" thing working for them...

anywho... i got the wire. in plenty of time as we all know i took my time assembling the treadwall. did a little bit of testing with and electrical meter to make sure i got it right, plugged it in and the first thing i saw.... HI. ha ha haa ah ha! my treadwall just said HI! worked no sweat. and its nice cause it can also count down. so you can preset it with your target. which is a mind game but it helps motivate me that much more. picture?


almost forgot ... because its not included in the standard assembly the directions dont mention that the display bolts on with the spacer bar. this non-standard is the reason that they forgot my power wire by the way. also, wrap the wire around the spacer and i suggest taping it with route/duct tap just to keep it from getting snagged to caught in the chains. it's all kinda a no brainer but i would also hold off putting it on until after youve raised the unit. or maybe brewer's ledge has a better way? comment?

Saturday, June 12, 2010

F That F 'N' S! , the worst of the Treadwall upgrades

Okay the title is harsh..... but thats the way i feel about these upgrades..... you on the other hand may feel remarkable different. which is okay.... youre wrong, you really are, but thats okay its your money spend it how you want. obviously there are people out there who want these things or they never would have gone into production.

*if you work at Brewer's Ledge, maybe in product development, please dont read this!*

**oh!... unless your a man, in which case carry on**

Textured Panels ~ i guess there is in the climbing industry a love affair with attempting to create the most realistic or close approximation of the experience of climbing on real rock. personally, i agree with that ideal, but look kids, sometimes you just go too far from the source to keep the illusion going.

take a look at the "texture" of this wall... does it honestly look like rock? also, what is the practical use of texture? ....smearing, really youre gonna place a tenuous foot smeared on a moving surface. Not to mention the wall is overhanging as much as 35 degrees. really? you need to smear on that?

now i know this matters little when we consider form and function.... but, it's UGLY! its not aesthetically pleasing. its messing with my fung sway or whatever. how can i enjoy sipping my green tea and bending my self into my favorite salute the sun wolf gag position with these funky panels in the room. thanks ill stick by the nice unfinished wood. an uncarved block if you will.

well okay its another $495.00 i guess you just gotta help get someone through college!

Starter Hold Set~ so whatcha gonna do? you gotta have holds. unless you can climb like a gecko.

the FACTS: 38 holds, $289.00, $7.61 per hold.
as hold prices go thats not bad. on average you spend $45 bucks for a hold set of 5 to 8 holds. at the same time. i hate so-ill holds but they have a starter set that is 53 holds for $159.00.

not too mention the holds dont jump out at me as being cool fun shapes to climb on. sorry guys but im reasonably sure you arent manufacturing these holds yourselves anyway. so i dont feel that bad. odds are you have a contract with another company, mostly so that when you sell your walls to fitness gyms you can give them an all in one product. but you know the holds arent the bees knees ...so, you thought you would make it an add on for the suckers, when they get the KORE. im full ill skip this meal thanks!

The Ladder Line~ what the F%*#$! who came up with this? are you paying him? can you get that money back or did he spend it already? ....*deep breath* its okay that was a knee jerk reaction i know. also this isnt one of the "popular options" i know. but there was a you tube video that popped up and its in your promotional video so i had to address it.

WHAT?! $24.00 for one of these things? its a piece of DOWEL essentially bolted down on top of two foot chips!!!!!!!! $299.00 for the whole set? how many come in a set?!

this is like taking a superior product and blending it with old out dated inferior technology! like putting a walk-e-talkie in my cell phone! ....hey? can i get an etch-a-sketch for my drafting software!!! super! thanks!

if you dont agree with my summation, check out one of my previous posts! http://treadwallproject.blogspot.com/2010/05/ten-thing-i-hate-are-not-you.html . i still pee myself laughing every time i look at the endless ladder. but again i really hope this is just you guys marketing this to the fitness gyms cause theyre dumb and you thought "throw it their way too... maybe well get a fish?"

in closing i would like to apologise to the guys at Brewer's Ledge. i am ....a major ass. i hope i havent cost you any business. honestly, im pretty sure im not the unpopular opinion.

Counting On You.....

so, was that half dome in a day, el cap in a day, ....or the bog wall for a few laps....... how would you know?


honestly, i havent practiced counting since i had to prove i could get to twenty to pass kindergarten. but oddly enough i also remember have an argument when i was little with another duey about whos dad had counted the highest. both of i am sure was just lying our pull-ups off as we insisted "my dad comes home from work, crack a beer, and starts counting, he makes it at least a couple thousand a night.....should break into a million soon!"


oh how likely is that, counting... really kids.... only a child would brag about counting. the rest of us, well we developed the calculator, and the the computer.... and many other implements of measurement all for the sole purpose of avoiding ....counting!


so why would you buy a Treadwall and not pay the $390.00 dollars extra to get the time and distance counter. .....does this argument really need to go on?

Friday, June 11, 2010

Treadwall Kore: check out the legs!

i have wanted to delve into this area for a while, and i have touch on it previously.... but were gonna pretty much talk it to death this time around. what truly makes the difference between the Treadwall M6 and the KORE. we all know... at least you should by now, the "M6" is the flagship fitness gym model, the big, the bold, the beautiful. but.... its lame! my apologies to the boys at Brewers Ledge. but sticking to my poor tact approach, you knew that there was a population of climbers out there just like me that loved the idea but werent fully impressed. therefore you cant be to surprised to hear it said aloud....i mean in print. as i was saying, it only goes from +12 degrees slab to -12degrees overhanging. fun for some yes...but we say boo, you can do better. so we were given the Kore. its lighter, trim, less frilly, thinner legs and she goes down. sounds like the kinda girl you sneak into the house when dad aint lookin? kidding...

so lets talk about those legs. the kore comes standard with only three height positions. the fixed positions are -25, -30, & -35 degrees overhanging. while, these angles are remarkably more effect for a true climber and their training needs when compared to the M6 option, i am glad theres more, the angle changing frame up grade! ...yes up grade means more money. $460 will be worth it, because when you buy this you get -5 to -35degrees of climbing. which to me sounds awesome!

Wow! looking at these two scale drawings ive done just sold me on the fact that i made the right decision! you can really see the difference between the three settings of the static adjustment frame, and the extremes of the variable angle changing frame. plus, you know your body would really know the difference. im also sure youll agree the ability to vary your training even more will make the stave off the boredom that always comes with any training program.

i have an opinion that when training anything less than vertical is rarely helpful (aside from focusing on smearing technique). for someone who climbs regularly, a slab wall doesnt provide enough of a workout to promote gains. also, near vertical climbing technique and overhanging technique are very different. There is that fine line dividing when your pulling your hips in to keep as much weight as you can onto your feet and when your ass drops out below you, hanging most of the weight on your hands and all the feet are doing now is pushing you to the next hold while your core is trying desperately not to let you cut!

now, let me ask you something.... is there more near to vertical and slabby rock out there or hardcore mega roof overhangs? well... if you need a hint, gravity pulls on the rock too and the animals fight over caves for a reason! but i get it, well all love climbing the roofs i just want to encourage you to train all aspects of your climbing. plus endurance at a lower angle wont destroy your shoulders.

side story recently there was a climbing Comp at my local gym and one of the young hard core brutes was all pissed because one of his routes wasnt on the sick hard overhanging wall. he wanted the little kids to climb the slab. news flash! climbing is climbing, be versatile, if you only train one thing thats all youll be good at, and you will find boredom every time you find yourself out of your element. overhanging lends it self to big pulls on big holds. no really technique gets developed here. i find it sad thats all this kid looks for in climbing. wheres that satisfying flow when every move is a big dynamic throw to the next roof jug?...did i get on that horse AGAIN?! compnee' dismount....

.....so -5 to -35 degrees overhanging, i like it.... versatility. the static adjustment frame essentially has overhanging, while the angle changing frame has a range from near vertical to overhanging. point made!
the meat of the blog is coming now, i promise. i was talking with Garnet when i placed my order and the subject came around to the function of the angle changing frame and how it works. i had asked how easy it was to change the angle. see if you look at the picture there are hand cranks on either side...which is fine with me. a more complex design might utilize one crank but at that point the complexity can leading to more things that could go wrong. remember your climbing system and the SERENE mnemonic?
  • S -- Solid -- Are all the pieces in the anchor solid?
  • E -- Equalized -- Are all the pieces equalized?
  • R -- Redundant -- Is there redundancy throughout the system?
  • E -- Effective -- Was the anchor construction simple and quick with no fuss?
  • NE -- No Extension -- Will the system be shock-loaded if a piece blows?

focus on Effective, simple because a more complex design is closer to failure that a simple effective one. ....entropy leads to chaos ...follow me. dog namit! im wordy today!!!

Garnet says to me that the angle adjusts quickly within each setting bolt position, but going from the full height to the lowest takes a little longer, around three minutes. he quickly promises me that its okay, no big deal and that one person can do it alone. ....im a little stalled, i remember looking at previous low quality photos trying to figure it all out so now im extra confused. he goes on to explain how the same fixed bolt settings that are on the standard frame are on the angle changing setup. the hand cranks adjust up and down from those positions. so you have to move things around a little to get it from -5 degrees to -35 degrees. he also sent me a picture about something else but i was able to get a good view of the cranks as well check it out!


the first picture shows the treadwall in the lowest position while the second shows us the highest position. clearly you can see the three bolt holes where the crank adjust its position. oddly enough though if you look closely you will notice in one picture the crank is on the inside and in the other its on the outside. WHY? well the first photo is from a customer the second is from the company, so my guess is the guy reversed how he assembled his wall.....oops!

but going back, that assembly error got me thinking (i like to tweak the patent), the bolt position and assembly changes the angle potential of the wall. so, could another bolting position be place the horizontal footing at the bottom. if so it would allow the wall to be made even steeper. my first problem solving thought is... would this then allow the wall to tip over? but i guess you could counter that by bolting it to the ground! well see when it gets here, either way im not likely to start customizing my wall right out of the gait.

.....anyway, i had a point when i started this post but now i lost my train of thought.... so, hope it was a good and informative read! im gonna make another volume today. so the next post should be more on that topic.

Tuesday, June 1, 2010

weather upgrade?!


so you can add a weather upgrade to the wall if you want. to be honest i considered it for a little bit, i do live in the northwest. but in the end i think it would be better to just build the shed and have an enclosed area to climb in. you know... get my self a little space heater and keep the winters warm for climbing.
also, maybe im just not educated in the newest of technologies in weather proofing.... but i look at this picture and i see something that is gonna rust no matter what if it stays exposed to these conditions.
lastly... if there is snow on the ground why isnt this guy out climbing with those ice tools? isnt the point of the treadwall to allow you to train when it's OFF season? maybe, it just a promotional shot?
anyway...why does six weeks feel like such a long time?