~~~~~~~~~~~~~~~~~~~~~~~~~~~~~~~~~~~~~~~~~~~~~~~~~~~~~~~~~~~~~~~

the whole point of this blog is to help others with all the questions they have about setting up a similar home climbing gym, and ramble about a variety of climbing related subjects.
There is a variety of subjects... most involving rock climbing, written about on this blog. MAKING VOLUMES OR CLIMBING HOLDS, is probably one of the more popular subjects. just check the labels links or search bar to find your fancy.
of course if you want to go back and start from the beggining, please do! to that end, if there are any question let me know ... i encourage you to add comments for others to read or if you want to get me directly you can email me at treadwallproject@hotmail.com
IF THIS IS YOUR FIRST TIME, READ THE MUST READ LIST.... oh!, ...and you have to fight!
Showing posts with label Training Ideas. Show all posts

Thursday, July 14, 2011

Saturday, February 12, 2011

hungry hungry Hangboard...

one good way to start your hangboard training tradition is with a good old fashion assessment. take all the hold positions and gauge your strength. in general, 10 or more pull-ups is great as is holding any hold longer than 12 seconds. when you get your max values for each hold and exercise take roughly 80% of that and apply it to your training routine. if you are in that greater than 10 pulls or 12 sec range for exercises, consider other options such as training on a more difficulty hold or adding weight with a vest or harness. here is an example of my test form for my metolius pure force board. oh and max pull refers to the most wieght you can add and complete one full pull-up. any other questions or comments... please share with us!

Wednesday, February 9, 2011

Feel... The... hang?

i cant decide if i hate the title of this post...moving on... so you bought that hangboard casue everyone told you what an awesome training tool it was. that was 3 years ago. you hung the hangboard in in your house or garage. that was 6 months after you got it. three weeks ago you had friends over for beer and to watch climbing movies. you pointed out the hangboard...or they discovered it on their own. you do a couple of pull-ups as you tell your guest how cool it is. their jealous that you have one. but inside you hide the secrete that you havent touch it more than ten times since you got it. the details may vary but its still your story, and the story of so many other people.


so why are hangboards so popular and yet so useless for many people? i think its a bit of motivation and a bit of not knowing how to use it. we start out with good intentions and excitement for training. often when we people have no idea how to train they just start running for the horizon without direction. eventually you run out of motivation for horizon chasing and your tools for training begin to gather dust.

in this post im gonna try to inspire you to start using that hangboard on days you have only 30min to spare. keep in mind this is only what works for me. also, there are several websites that do a much better job of this than me, and you will see i've adopted much from them.

here are a few:

Dave MacLeod: http://www.davemacleod.blogspot.com/
Multiple Authors: http://info.rockrun.com/
Eric Horst: http://www.trainingforclimbing.com/
Metolius: http://www.metoliusclimbing.com/how-to-guides.html

so you have 30min? exactly... heres a workout:

30 min Workout
~5 min Aerobic Warm-up. i do a treadmill routine of 2 min walk / 2 min jog / 1 min walk. during my walking i do several stretch for my hands, arms and shoulders. if you dont have a treadmill anything that gets the blood pumping will do... hell you can do jumping jacks if nothing else. (25 min remaining)

~10 min hangboard routine (warm-up set). this set is devised to get the arms ready to do a harder workout. this routine lets me feel how strong i am and gauge whether or not i have an festering injury. you may choose to use my routine or adjust it to better fit your level of conditioning. (15 min remaining)

~15 min Heat Routine. heats have different make ups depending on how they are devised. in my case i run 8 (1 min) heats with 7 (1 min) rest periods between them. (DONE)


1 hour Workout

~5min Stretching routine. (i will have an upcoming post on stretching)
~10 min Aerobic Warm-up. (2min walk / 5min run / 3min walk)
~10 min Hangboard set. (warm up routine)
~15 min Heat Routine. (same as above)
~10 min hangboard set. (intermediate or advance)
~10 min treadmill routine. This set is done with the addition of 10 lbs dumbbells.
2 min walk
1 min run
1 min walk & bicep curls
1 min run
1 min walk & bicep curls
1 min run
1 min walk & bicep curls
2 min walk

how about seeing my detailed routines?

This first set is my warm up routine. you will need a stop watch or timer that has a second counter. Personally i have a digital counter i use. it works well as i can see the time from several feet away. to train using this routine is simple it is modeled after the metolius set... with my own tweaking. to complete this routine do each described task at the start of the minute. the time remain is to be used for rest before the next minute. simple enough?...


the next two routines work the same the key difference is to include hard activities. this can easily be altered when you make your own routine. the goal is to be near failure at the end of each step. try timing your hangs on each hold position available on your hang board. then take 80% of each time and apply it to your routine. than test your routine to see how well you can move through it. if you find yourself not working hard enough adjust your times, add additional activities such as pull-ups, knee raises, lock offs or leg lifts. if you find the basic routines to challenging try placing a chair a couple feet behind the board to stand on.


Next are the examples of my heat routines. these have a distinctly different format, the concept is the use of one minute blocks with one min rests. in theory this makes your training more representative of the timing of movement required to do a crux of a route or boulder problem.


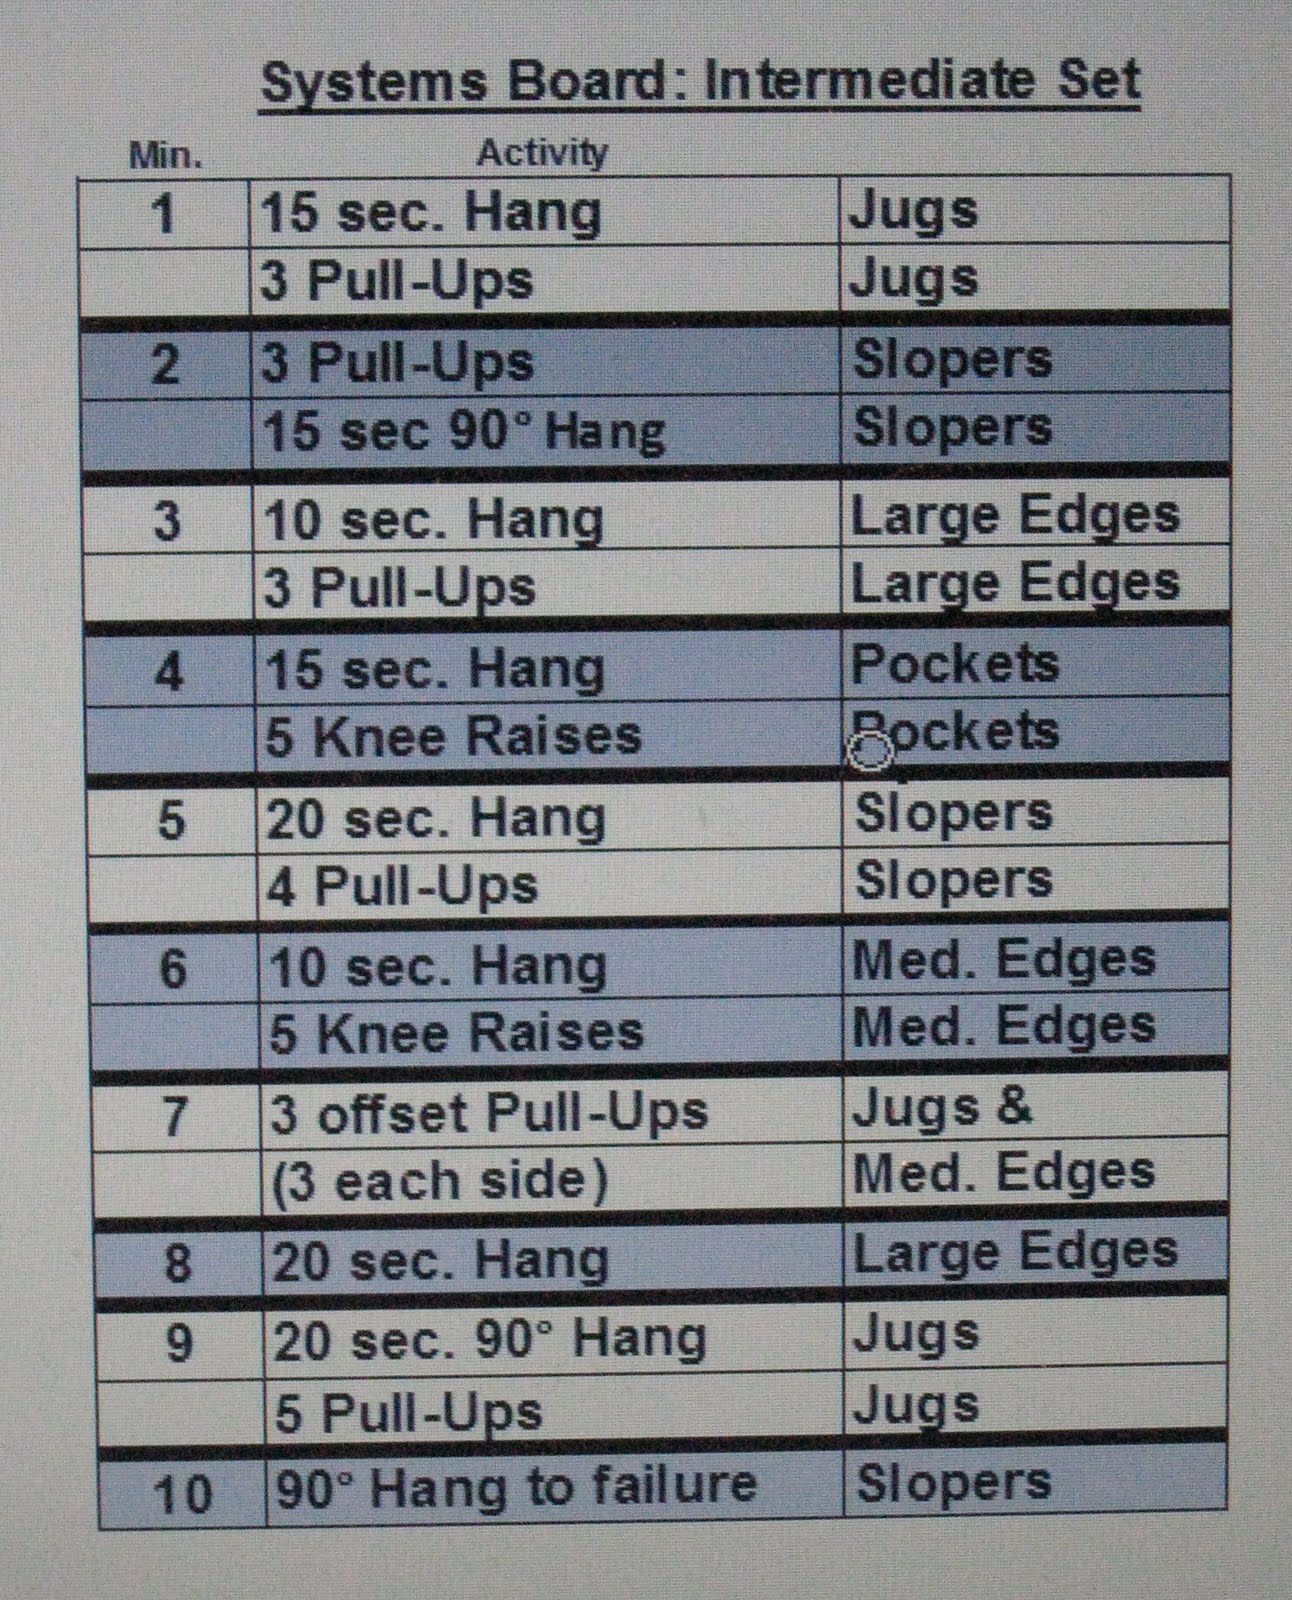
here's the way i do them:
second 0 ~start standing under the board.
second 1 ~pull-up on the intended hold.
second 2-5 ~drop to a 90 degree lock off
second 6 ~pull up and drop to the ground
second 7-10 ~rest

there is a thousand different ways to tweak this model to your own requirements. it's all up to you to get creative. if you bouldering i suggest working lock off strength.


to make the exercises harder...
use smaller holds, reduce your rest times add some weight (you can use an old harness and sling to hand weight down your center of gravity... oh and start low), hang with one hand in a worse hold, and alternate hands between hangs so each hand has hung 3 times off a smaller hold and 3 times off a larger hold.

to make excercises easier...
reduce hanging time and increase resting time for each hang. instead of 6sec hang and 4sec rest, try 5&5 (or 7&3 for harder), use a bigger hold, try putting a foot on the wall or chair in front of the hangboard to take some weight off.

in the end it's all up to you. i suggest having a little training log. track how it's going. you will come up with ideas as you progress. youll want to note what was easy day to day. and focus more on those little gaps to make your training more well rounded and focused. as always hope it helps!

Monday, February 7, 2011

if you dont tape your hands... tape your mouth.

all the folks i climb with know i tape. i tape heavily... religiously... some agree with me, some could care less and others still freak out about it. i would say this third group is the most annoying. arguments get made about how taping cheapens the sport. if your one of these people just put the tape over your mouth so we dont have to hear it. climbing is barely a sport. and for those of you constantly making up rules and keeping score? really? stop and come back to simply enjoying climbing. next to that, do you climb barefoot? ...chalkless? ...ropeless? do you tape tendons? ...i cant think of one person who bitches about hand taping that doesnt tape up a tendon. and i've never heard of a redpoint invalidated because of taping an A2 pulley tendon. on a person note, dude i work in the medical field... AIDS, HEP. C, MRSA... they all love a good vector of transmission.

now because i love tape gloves, and im so great at it... people just always ask my preferred method... not really... i just never stopped listening to that positive self talk my mom helped me create!


step 1: i used a little "magic marker" to help you see in the pictures how i do things. so, three perpendicular pieces down the back of your hand. this creates a base layer. i like to slap the tape down onto the back of my hand to get it to settle.


step 2: half strips, depending on your hand size, about 10 inches long. go straight up between the bones of the third and fourth finger. then twist the right a the middle three time. this makes a nice "cord" to wrap the finger.


step 3: wrap around the finger and cross back across the hand to end on the opposite side of the wrist. then repeat the process for the index finger. i dont wrap the middle two fingers... its superfluous.

step 4: the finishing boxer wrap. start at the outer prospect of the hand wrap around the hand over the knuckles, just a little, and come around the palm of the hand. you want this tight but not overly so. spread the fingers as much as you can as you tightly wrap around. your get the hang of it after a few tries.

step 5: make only one complete wrap then come down to the wrist. make two complete revolutions around the wrist. i like to make this pretty tight also. then cross back up over the back of the hand and wrap the palm again making one full revolution and ending in the palm.

step 6: you can see in the picture where i end the tape. i added a black line to show it more clearly. its best to end here because you can now pinch and twist the tape into a cord across the palm as seen in the second picture. this will keep the tape from ever pealing up as you stuff it into never ending feet of beautiful cracks!

step 7: cut the tape off as you see. then if you lay the tape flat you can see that there are the tabs left over. cut those off and you can reuse your tape glove by applying a simple boxer wrap. i usually get about 4 or 5 days out of a good glove. if you try this methods and find it useful... please comment and share with the other readers!

Monday, January 31, 2011

tendons... you break it you bought it!

I’ve considered doing this topic before… but didn’t because everyone has a difference of opinion in regard to the best method of taping. Even the doctors many people go to will argue about whether or not one method is valid over another. So here’s how I’m gonna play this one. This post will have absolutely no medical research to back it up. The only thing you get is my opinion… and that isn’t worth much kids. Plus to be honest some folks have got me a little worried that about the world we live in. So if you want entertainment, come to me. You need a bone marrow transplant…. STOP LOOKING AT BLOGS!

Sooo taping…. I have seen a lot of terrible tape jobs lately, actually, since day one of starting climbing. In general it’s the new kids that screw it up, but not always. Examples? Sure…

In picture number one the tape covers the proximal phalanges (closest bone). This is a very common and simple taping method. This is meant to provide support to the annular A2 pulley tendon. From what I “hear” a very common site for partial and complete tendon tears caused by use and abuse associated with rock climbing.


Now the bitchy criticism… the tape is incredibly loose. The annular tendons run perpendicular to the bone, tightly wrapping another tendon close to the bone. This second tendon runs the length of the finger through the wrist and attaches to the forearm muscles. This is the mechanism by which we bend the finger closed. If the tape isn’t tight you’re not supporting the tendon you just have a stylish disposable ring on.

Moving on to picture number two, this shows the tape running “roughly” across the C1 and C2 cruciform tendons and the A3 annular tendon at the PIP joint. Cruciform means “crossing”, think of two lines crossing in an “X” shape.


This one’s easy for me to complain about… you can’t grab anything if you can’t bend the finger. FAIL… try again.


Tape job number three …is comprehensive. The tape tightly wraps every tendon including C1, C2, C3, A2, A3, & A4. There is also another kudos, the finger choice is correct. The most common fingers (in my experience) to get injured are the middle and ring finger. I believe this to be associated with the way the forearm muscles align to add strength. What does that mean? Hold your hand open. Curl just your pinky into your palm… what did the ring finger do? Weird it curled a little also. That is because the fingers aren’t fully independent. The median fingers tend to get the most strength. They are also longer and therefore get the most purchase on the hold. All that means they take more wear and tear…like the pun? So, if you want to tape the fingers preventatively which should you pick?

On the other hand… this guy effectively splinted the entire finger and won’t be able to grab anything, just like the last guy.

Tape job number four. This is the super common “I want to climb in the roof at the bouldering gym but I’ve torn open flappers on my entire palm” tape job. Unfortunately once you rip the skin the only thing to do is go home and wait for it to heal. Do push-ups and sit-ups it will help you climbing as much as continuing to ruin your hands will. If you don’t listen to me, all you will find is bad technique for trying to compensate for the pain and a horror show when you take the tape off. The tape will not stay secure. Your palms will sweat and leak plasma which will cause the tape not stick... then the tape slips around more and you make the flappers worse.


for some reason guys never hear this part so ill say it again. THER IS NO WAY THE TAPE WILL STAY. THE TAPE WILL NOT WORK... EVER!

Trust me… go home, read a book about climbing techniques, nutrition, or jog on the treadmill like I should be doing right now.


So, there are the don’ts… what are the dos? Well I can only show you what works for me. First tear the roll of 1 inch tape down the middle to get approximately a ten inch long strip. Make the strips thinner if you have really tiny fingies. You can use any cloth medical tape. In time you will learn that they all suck for different reasons. Some don’t stick well, other stick too well and leave crappy residue on your hands. Some tear too easy and others are so hard to tear your belayer gets sick of waiting. Find the brand that works for you.

Start by wrapping the proximal phalange, begin on the back of the finger and make one full wrap. Then, with the finger at an approximate 120 degree angle, cross under the pip joint to the medial phalange. Make two full revolutions around the medial phalange before crossing back down to the proximal phalange. Make one last full wrap around the finger. Hopefully the tape ends on the back of the finger so it won’t peal or roll back. Check out the pictures.


So if you did it correctly, the fingers when relaxed are slightly bent. If you try hard you can get them almost totally straight. You should have no issue making a fist. On the inside of the hand you will see this pattern { llXll }. When you put the tape on it should be tight. The fingers will be instantly redder than the untapped finger. Make it tight so you actually support the tendons. Don’t worry about cutting off circulation. Think about it like the kids with their “skinny” jeans sure they have on pants for a nine year old, but because its cloth it will stretch. If after you’ve been climbing for a bit and the finger is cold and tingly then use your best judgment… id loosen the tape.

So there is my bit on taping for injury prevention. It’s quite possible that everything you read is just crazy talk (see i was recently at a bachelors party and am still possibly hung over). Like I have said… NOT A DOCTOR. Everything I have told you is basic and can be pieced together on the internet, with minimal research… or none? Maybe I made it all up… tee hee!

Monday, January 24, 2011

the perfect route


i like giving you images first and letting you thinking about where this is all going! any ideas?

(treadwall) - (assembly) + (colorful yet cryptic drawing) = ....blog post!

alright for awhile now i have been trying to make the perfect route for warming up and doing never ending mileage on the treadwall. i had some criteria for the route. i wont bore you with all those details so we can skip to the point. i wanted the route to have equal movement bilaterally for the body. often routesetters will unconsciously set routes to favor their strong side, be it left or right. the treadwall is a perfect medium for avoiding this failure.... or so i thought. that drawing above was the first map i made for the treadwall. it's crude, but it shows all the possible bolt positions in one rotation of the wall. i made it so i could plan out my perfect route as opposed to trying to due it freely on the route as i have done when i first got my treadwall set up.


here comes the bad part... im sorry brewer's ledge, but your wall has a flaw. it is impossible to set a route to have exactly mirrored movement for the hands and feet. not in their method of assembly anyway. after spending WAY TOO MUCH time on this problem i finally came up with one solution. i would take off half of the panels and reorder them so that the first 10ft of climbing was set opposite to second 10ft.

on the right here you see my second map.... i made this one on the computer... got tired of drawing, and now i can print out a new one if i need it. but by comparing the two maps you can see where i change the bolt pattern to allow for the setting of a perfect route. focus on panel lines 1&40 as well as 20&21. by making this adjustment i was able to set a route that recycles and is perfect to the micron... okay not that perfect but its as perfect as 1+1=2.

oh, little caveat i dont belief all treadwalls have this problem... i looked back through some of my archive photos and i think this bolt pattern is specific to the newer treadwalls. im not positive but i believe some older walls had a more standard grid bolt pattern (as opposed to the offset pattern found on my wall). if im wrong oh well...fixed my issues anyway. GARNET!? i know you read this bad boy... throw in a comment what do you think?! dont be shy... unless you might get fired? in which case, dude take care of your fam-damly!

these last two shots i put in a bunch of my own foot chips (yup! designed, molded, and poured in my house) on the re-ordered panels to help emphasize how the bolt placements are offset. the blue tape line show the gap between panels 1&40 by the way. lastly ill say, i like the offset pattern, it helps with being able to see where to put your feet. it doesnt stack the holds on top of each other too much. but the standard factory assembly instruction tweaked a bit works better for me. i said my piece, check out the last pics, comment if you have a pair!


Tuesday, January 18, 2011

Physical assessment (Part 3)

....Bouncin Bobbin Bhuda on a Bungee Cord, i am incredibly sick of writing these last three post. i really hope someone reads them and in conjunctions finds them useful. and should that usually quiet and contented reader choose to leave a comment on the subject... it might make my effort worth while!

....part three.
Body Mass Index (BMI)
Purpose
: BMI is a measure of body composition, i.e. muscle, fat, and other body tissues. This sounds more scientific than it truly is. The conventional wisdom is that there is a standard ratio of fat, muscle and the remaining tissues in all people. While this may be practically true, it is not representative of fact. A ratio score indicates a persons level of fitness. The BMI can be inaccurate, particularly with large and muscularly lean athletes scoring a high BMI level which incorrectly rates them as obese. When interpreting the result the higher the score is, the more overweight you likely are. Like any of these types of measures it is only an indication and other issues such as body type and shape have a bearing. Remember, BMI is just a guide – again, it does not accurately apply to elderly populations, pregnant women or very muscular athletes such as weightlifters. To have truly accurate BMI assessment seek a trained professional where you will be poked, prodded, squeezed in calipers, and drowned in an immersion pool.
Required Measurements: Height and weight measurements.
Procedure: BMI is calculated by taking a person's weight and dividing by their height squared and then multiplied by a constant of 703. For instance, if your height is 72 inches, the divisor of the calculation will be (72x72) = 5184. If your weight is 185lbs, then that is the numerator. Your BMI is then (185/5184) x 703 = 25 (approx.)
Scoring: Use the table below to determine your BMI rating. You can also use an ideal height and weight graph found online. Record your current score.


Hip waist ratio
Purpose
: To determine the ratio of waist circumference to the hip circumference, as this has been shown to be related to fitness and overall health status.
Required values: Hips and waist measurements.
Procedure: A simple calculation of the measurements of the waist girth divided by the hip girth. Waist to Hip Ratio (WHR) = Gw / Gh, where Gw = waist girth, Gh = hip girth. It does not matter which units of measurement you use, as long as it is the same for each measure.
Scoring: There are tables online that give general guidelines for acceptable levels for hip to waist ratio. You can use any units for the measurements (e.g. cm or inches), as it is only the ratio that is important. Record your score.


Resting Heart Rate
Purpose
: Once a normal resting heart rate has been established, it becomes easy to determine your physiological state. As you get fitter, your resting heart rate should decrease. This is due to the heart getting more efficient at pumping blood around the body, so at rest more blood can be pumped around with each beat, therefore less beats per minute are needed. See this resting heart rate chart which shows the expected heart rate for different ages and levels of fitness.
Equipment: a stopwatch.
Procedure: The measurement of resting heart rate (the number of heart beats per minute) should be taken after a few minutes upon waking whilst still lying in bed. Give your body some time to adjust to the change from sleeping before taking your pulse (2-5 minutes). Taking a radial or carotid pulse measurement (at the wrist or neck) is usually the easiest method. Counting the number of beats over a full minute is the most accurate method.
Scoring: Record you beats per minute (BPM) to establish you baseline resting heart rate.
Interpretation: During a period of training, small changes in resting heart rate can reflect adaptation processes, or just a normal response to the previous days training load. Resting heart rates can also be affected by ensuing illness, fatigue and overtraining. Also be aware that other factors such as smoking and caffeine, and some medications, can cause changes in resting heart rate. If your resting heart rate is 10 beats per minute or greater above normal and it persists you may want to see your doctor. So…what should it be? Normal resting heart rates range anywhere from 40 beats per minute up to 100 beats per minute. Ideally you want to have a resting heart rate between 60-90 beats per minute. The average resting heart rate for a man is 70 beats per minute, and for a woman 75 beats per minute.


Exercising Heart Rate
Purpose
: Why measure heart rate during exercise? The heart rate during exercise is an indicator of intensity, or in other words how hard you are working. As your fitness increases, your heart rate should decrease for any given exercise workload. This is the basis of many of the sub maximal aerobic fitness tests.
Equipment: A stopwatch in conjunction with any treadmill, open track, or gymnasium may all be used.
Procedure: The method of exercise used to elevate the heart rate in inconsequential as long as the same test may be performed consistently. For example many employ a walking warm-up followed be a two minute run at a specific pace to elevate the heart. Following that use the same method used to obtain the resting heart rate. Although instead of counting for a full minute count the number of beats starting with zero for fifteen seconds and multiply the result by four.
Scoring: Record the BMP
Interpretation: During exercise, your heart rate will depend on the intensity of exercise, your fitness level, and your maximum heart rate (which may also depend on your age). Some training programs set the intensity of exercise using heart rate guides. Many of which are available online. Due to the constant movement of the athlete during exercise better results can be obtained using a heart rate monitor or similar device should you choose to use one.


Performance Appraisal
Purpose
: This final value is entirely subjective to the individual. Its value lay in its ability to quantify the overall sense of improvement, and allow for assessment of a trend in development.
Equipment: None
Procedure: this scoring only applies to those tests requiring physical activity with exception of the resting heart rate. In other words, the tests listed in part one and the exercising heart rate test. For each test you will assign a score of 1-3. This score is based on how well you performed in each test and your general feeling of fitness during the test. 1: indicates more than one of the following: sloppy technique, poor muscle control, complete failure to perform and decreased mental confidence. 2: indicates one of the previous criteria. 3: indicates the test was performed confidently with good technique with the highest possible score achieved.
Score: Total the scores applied to each test. You should receive a score between 10 and 30. Then divide that score by 30 to receive your percent score. Record that percent with your other tests.


...so now that that's done get to training and use the tests to readjust your training appropriately.

Physical Assessment (Part 2)


Body Composition


here we are at part two of our journey from fat sack of crap to sick beast with tendons of steal. the next tests you will be required to perform are easy... but, the results may be just as hard to face.

i will again prompt you to read my disclaimers, and also suggest that if you have not read the previous post that you do so now rather than continue and confuse the crap out of yourself. not that im suggesting that my writing has a continuitous nature in the first place. anyway.... you can use these measurements as guides for progress in your struggle to be healthy. in and of themselves they mean little to nothing. but as you establish a baseline and then later are able to follow the treading, you will be able to pat yourself on the back for your positive results. again, if you have any medical concerns through this please seek immediate profession medical help.


Height
Purpose: The measurement of height is a standard component of most fitness assessments. Height or lack of height is an important attribute, especially when considered in conjunction with weight.
Equipment: A standard tape measure.
Procedure: standing height is the measurement the maximum distance from the floor to the highest point on the head, when the subject is facing directly ahead. Shoes should be off, feet together, and arms by the sides. Heels, buttocks and upper back should also be in contact with the wall when the measurement is made. Height measurement can vary throughout the day, usually being higher in the morning, so to ensure reliability height should be measured at the same time of day. Additionally, height may change with increased flexibility and stretching. So it would be reasonable to have change in height with physical training.
Scoring: Record the height in inches.


Weight
Purpose
: measuring body mass can be valuable for monitoring body fat or muscle mass changes, or for monitoring hydration level.
Equipment: An accurate scale, a scale with more than half pound variance is inappropriate for this need.
Procedure: Stands upon the scale with minimal movement with hands by their side. Shoes and excess clothing should be removed. To improve reliability, weigh routinely in the morning (12 hours since eating). Body weight can be affected by fluid in the bladder (weigh after voiding the bladder). If you are monitoring changes in body mass, try and weigh at the same time of day, under the same conditions, and preferably with no clothes on. Always compare using the same set of scales. Keep in mind measuring weight can be used as a measure of changes in body fat, but as it does not take into account changes in lean body mass it is better to use other methods of body composition measurement.
Scoring: Record weight in pounds

Waist
Purpose
: A measurement of waist girth reflects of the amount of abdominal fat (visceral fat).
Equipment: A flexible body tape measure and pen for marking the skin.
Procedure: The waist measurement is taken at the level of the umbilicus (navel or belly-button). When recording, you need to make sure the tape is not too tight or too loose, is lying flat on the skin, and is horizontal.
Scoring: record the diameter in inches.


Hips
Purpose
: to measure the circumference of the hip area, as a measure of the underlying hip structure, musculature and adipose tissue (fat). When combined with the measure of abdominal girth provide the value of the Waist-Hip Ratio.
Equipment: A flexible body tape measure and pen suitable for marking the skin.
Procedure: The hip girth measurement is taken over minimal clothing, at the level of the greatest protrusion of the gluteal (buttock) muscles. The subject stands erect with their weight evenly distributed on both feet and legs slightly parted, making sure not tense the gluteal muscles. When recording, you need to make sure the tape is not too tight or too loose, is lying flat and is horizontal.
Scoring: Record the diameter in inches.

Chest
Purpose
: To measure the circumference of the chest, as a measure of the chest muscles mass and adipose tissue (fat).
Equipment: A flexible body tape measure and pen suitable for marking the skin.
Procedure: This measure is taken at the level of the middle of the sternum (breast-bone), with the tape passing under the arms. After the tape is in position, the arms should be relaxed by the side, and the measurement taken at the end of a normal expiration. When recording, you need to make sure the tape is not too tight or too loose, is lying flat on the skin, and is horizontal, particularly around the back. Clothing over the site should be removed if possible to make sure measuring tape is positioned correctly and that the correct circumference is determined.
Scoring: Record the diameter in inches.

Bicep
Purpose
: To measure the circumference of the arm, as a measure of the underlying musculature and adipose tissue.
Equipment: A flexible body tape measure and pen suitable for marking the skin.
Procedure: The arm is raised to a horizontal position in the sagittal (forward) plane, with the elbow at about 45 degrees. The subject maximally contracts the biceps muscle, and the largest circumference is measured. When recording, you need to make sure the tape is not too tight or too loose, is lying flat on the skin, and is kept vertical. The maximal girth is not always obvious, and the tape may need to be moved along to find the point of maximum circumference. Because physical activity can increase blood flow and increase the overall girth, it is best to take measurements at the same time of day when fully relaxed.
Scoring: Record the diameter for each arm in inches.


Forearm
Purpose
: To measure the circumference of the forearm, as a measure of the underlying musculature and adipose tissue.
Equipment: A flexible body tape measure and pen suitable for marking the skin.
Procedure: The subject holds the arm out with the palm facing upwards. The measurement is taken along the forearm at the point of the largest circumference. The maximal girth is not always obvious, and the tape may need to be moved up and down along the forearm to find the point of maximum circumference, which will usually be found closer to the elbow. When recording, you need to make sure the tape is not too tight or too loose and is lying flat on the skin. Because physical activity can increase blood flow and increase the overall girth, it is best to take measurements at the same time of day when fully relaxed.
Scoring: Record the diameter for each arm in inches.

...mkay, i will have more coming soon... in part trois!